Position and Size
Partial pixel offsets and sizes guarantee that your golden tests will have flaky false failures when running on different platforms, or even running on the same platform through Docker containers.
Most of these situations are outside your control. Your UI is what it is, and that UI
probably positions some things at partial-pixel offsets, e.g. (45.7, 203.83), and/or
partial-pixel sizes, e.g. 103.2 x 46.7.
That said, some steps can be taken to reduce the likelihood and severity of these partial-pixel offsets and sizes.
Golden Test Device Pixel Ratio
It's important to understand the concept of device pixel ratios and how they relate to widget tests and golden tests.
Background of Logical Pixels
Over time, screens have evolved to include higher and higher pixel densities. This posed a problem for app layouts in earlier years, where developers hard-coded various dimensions, which then looked comically tiny on newer device screens.
To help port existing layouts to new screens with higher pixel densities, devices started reporting dimensions in terms of "points" (Apple) and "density-independent pixels (DIPs)" (Android). Both of these concepts are similar - they define dimensions in terms of physical distances, rather than pixel count. This way, a screen layout that's made for a 400px x 800px mobile device will work equally well on a screen with a size of 800px x 1,600px.
Of course, Flutter honors measurements in terms of these physical distances rather than
pixel distances. In fact, every width, height, x, and y value that you define in Flutter
is actually a density-independent value, NOT a pixel value. Flutter calls these "logical pixels".
Flutter tracks and reports the number of "physical pixels" per "logical pixel" in a property
called devicePixelRatio,
which is published as part of Flutter's MediaQuery.
Device Pixel Ratios in Golden Tests
With all of that background information, why do pixels, points, and DIPs matter for golden tests? They matter
because Flutter attempts to simulate real devicePixelRatios in widget tests (including golden tests).
Speaking of which, another detail about widget tests you might know is that every widget test,
by default, is configured as if its running on an Android device. These two facts, combined,
means that every widget test, by default, simulates a devicePixelRatio greater than 1.0.
Historically, tests have used a devicePixelRatio of 3.0. This number is likely subject to
change based on the industry standard at any given time.
Golden Scenes are rendered to physical pixels. Therefore, rendering Golden Scenes requires
mapping from Flutter's logical pixels to the bitmap's physical pixels. This mapping can change
whole-number pixel values into partial-pixel values depending on the devicePixelRatio. For
example, imagine a devicePixelRatio of 1.75, and a logical pixel value of 30. Where would
that 30 end up in the final bitmap? 30 * 1.75 = 52.5. Thus, a whole value has become a
partial-value, and it will now undergo anti-aliasing effects when rendering to the bitmap.
What To Do About It
The answer is to change Flutter's test configuration to use a devicePixelRatio of 1.0
instead of the default.
testWidgets("my test", (tester) async {
  // Change the configuration for this test, and reset it after.
  tester.view.devicePixelRatio = 1.0;
  addTearDown(() => tester.view.reset());

  // Now do your real test work...
});
When you use flutter_test_goldens test runners, you don't need to worry about this. It's done
automatically, on your behalf.
testGoldenScene("my golden test", (tester) async {
  // Just worry about your test, we've already changed the devicePixelRatio to 1.0...
});
So I guess what we're saying is...if you use flutter_test_goldens you don't need to
worry about anything you just read :)
Positioning and Sizing Widgets
You may not think about it, but it's very common for widgets to be sized or positioned at partial pixel boundaries.
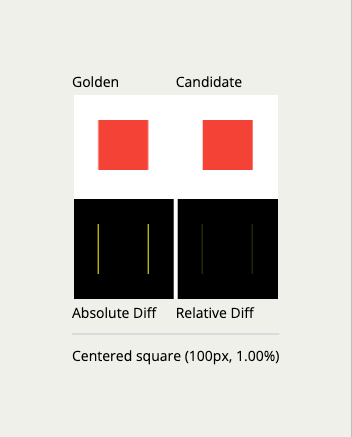
For example: Imagine a 25x25px square that's centered within a 100x100 area. The top/left
offset of the centered square would be (87.5, 87.5).
For example: Imagine a Row that's 100px wide, with 3 squares (25x25px) spaced evenly across it.
Those squares would sit at x-values of 6.25px, 37.6px, and 68.75px, respectively.
You may not be able to control these details within your app UI, but there's one place where it's very important to control these values - and that's within Golden Scene layouts.
Typical Golden Scene layouts include rows, columns, grids, and any other layout strategy that you choose to employ. A Golden Scene layout is responsible for placing every golden image in the scene. These golden images are later extracted for comparison within tests. Therefore, it's absolutely critical that a Golden Scene places golden images precisely on whole-pixel boundaries. If a Golden Scene positions an individual golden image on a partial boundary, the scene will interpolate the color of the pixels on the edge of the golden, which will change at least one pixel of detail all around the perimeter of the image. This will cause the golden to fail, even when run on the exact same machine that generated it.
To help our team, and your team, to create expressive Golden Scenes without breaking golden comparison, we've published variations of a few of your favorite widgets, which now snap their children to whole-pixel locations and sizes.
PixelSnapCenter: LikeCenterbut with offset and size snapping.PixelSnapAlign: LikeAlignbut with offset and size snapping.PixelSnapRow: LikeRowbut with offset and size snapping.PixelSnapColumn: LikeColumnbut with offset and size snapping.PixelSnapFlex: LikeFlexbut with offset and size snapping.
Take the earlier example of a square centered in a larger area. We can fix that
situation with a PixelSnapCenter.
First, the bad version.
SizedBox(
  width: 50,
  height: 50,
  child: Center(
    child: Container(
      width: 24.5,
      height: 24.5,
      color: Colors.red,
    ),
  ),
);
The bad version includes a square with a partial-pixel size of 24.5x24.5px, and that
square is located at (12.75, 12.75).
Let's snap the offset and the size with PixelSnapCenter.
SizedBox(
  width: 50,
  height: 50,
  child: PixelSnapCenter( // <-- the change
    child: Container(
      width: 24.5,
      height: 24.5,
      color: Colors.red,
    ),
  ),
);
The version with PixelSnapCenter positions the square at (12, 12) and forces the
square to become (25, 25). No more partial pixels.
These snapping widgets MUST be used when building Golden Scenes, to ensure that new/updated goldens are consistent with extracted goldens. However, if desired, these widgets can also be used in your regular widget trees.